User Favorite Panel for iDempiere / LogiliteERP

Note: This feature yet not in iDempiere. Ticket IDEMPIERE-3340 is created to add this feature in iDempiere.

Dashboard Panels is a great way to improve the usability of the iDempiere or Adempiere. You can give relevant information or quick access to important functionality for users from the dashboard. The goal of this tutorial is to show how can create your favorite menu in tree structure and organize more menu in better way inside an logiliteERP or iDempiere or Adaxa Suite (ADempiere) Dashboard Panel.

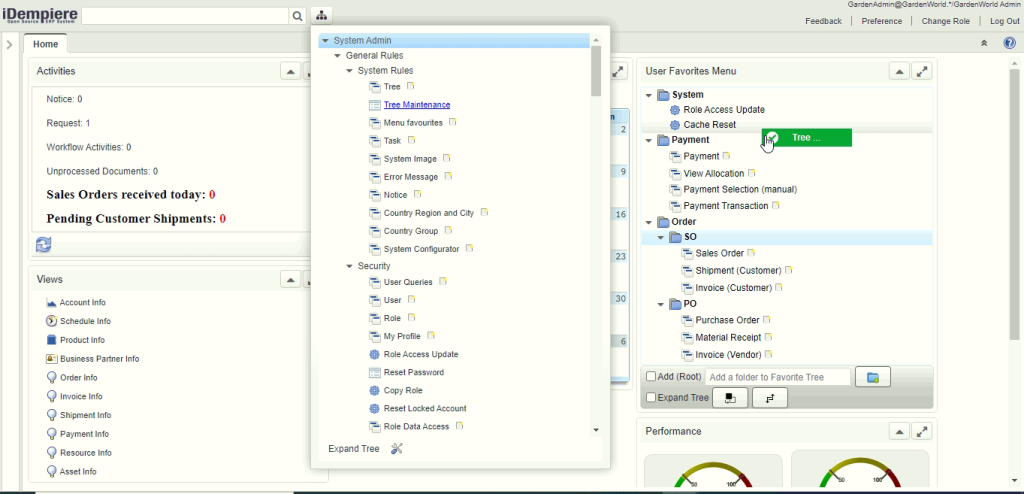
In below snap of Logilitte ERP, User Favorite Menu dashboard widget is shown on right side.

Tree Favorite View in Dashboard
Figure 1. Sample User Favorite panel with Drag & Drop menu item

LogiliteERP have Role based default favorite tree feature which is not in iDempiere.

  • The purpose of this default tree is to avail default menu for a role.
  • Only those user can change default favorite tree who are granted access by flag “Allow access in default favorite tree” on user window. User have not access to change default tree, still can modify his own tree.

    Allow access to User for default favorite tree
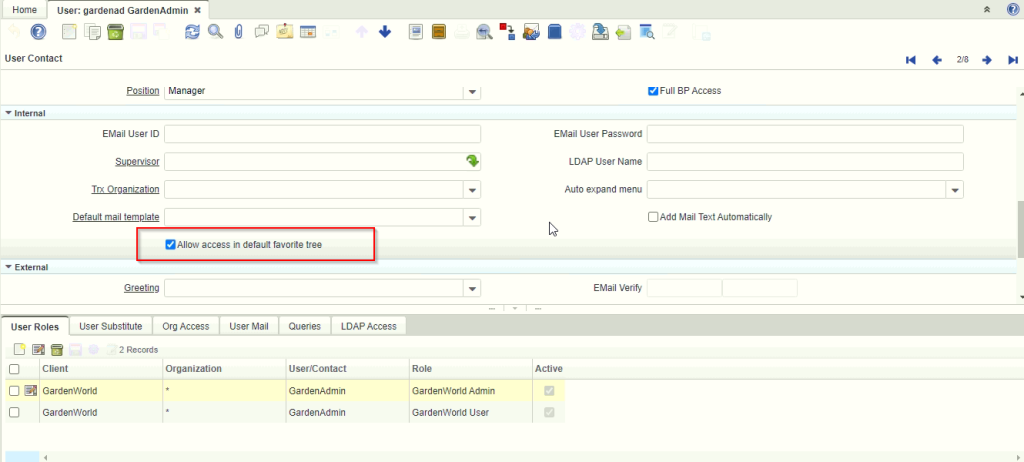
    Figure 2. Allow access to User for default favorite tree

LogiliteERP/ iDempiere User Favorite Operations:

Where [ iDempiere ] mentioned, feature is available in iDempiere version of favorite tree.

  • User can create summary/directory node by adding text on text-box and do Enter or click on Add folder button [ iDempiere ].
  • If Add (Root) checkbox is marked then it always new node created as root level. Other wise node created under the current selected node [ iDempiere ].
  • Marking Expand Tree checkbox expands all the node of the tree. Unmarked Expand Tree collapse all the nodes [iDempiere].
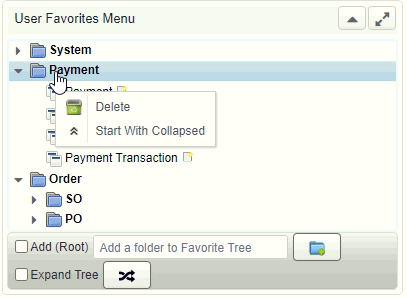
  • Right clicking on summary/directory node show context menu like [Figure 3][iDempiere]:
    • Delete : Deleting that node and its all child nodes too.
    • Start with Expanded : Mark summary node as default expanded.
    • Start with Collapsed : Mark summary node as default collapsed.
  • Fore renaming summary/directory node double click on it.  Rename dialog pop up which allow to change the node name [ iDempiere ].
  • clicking on menu item open window, process or report [ iDempiere ].
  • In menu item for windows, right side there is new button icon. clicking on it open window with new record [ iDempiere ].
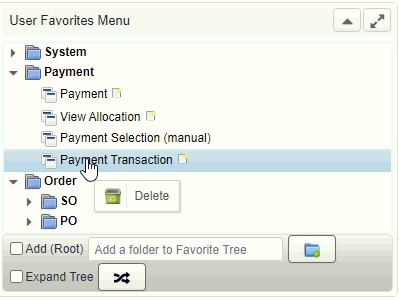
  • User can right click on menu node then it will show Delete option for deleting that menu item from tree. [ Figure 4] [ iDempiere ]
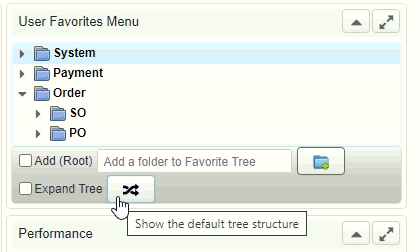
  • User can copy entire default tree structure to user specific tree. It will remove existing user specific tree structure if exists and copied default tree. [Figure 5]
  • User can navigate from default tree to user based tree and vice versa.
  • Inside tree user can move any node to any where. If menu item is already exists in same level then it will not allowed to insert duplicate node.

Priority to viewing favorite tree while login:

  1. User login to check if user specific tree exists then view that tree structure.
  2. User specific tree does not exists then view default tree structure.
  3. If both tree structure not exists then viewing user tree as empty structure.
Figure 3. Summary node context menu items
Figure 4. Delete menu item from tree
Figure 5. Default view to clone tree and move to user specific tree
Figure 6. Move to default view

Best Regards
Sachin Bhimani @ Logilite Technologies

Share Button

iDempiere Quick Form

Since iDempiere is forked from Adempiere, iDempiere has added many features to increase user productivity. This blog introduce iDempiere features which can improve user experience on browsing data and increase work efficiency.


About iDempiere:

iDempiere is an Open Source Enterprise Resource Planning (ERP) software package. Which helps companies satisfying their ERP needs and offer flexibility to customize. iDempiere has out of the box features which required to run your business. In this blog will introduce new features named Quick Form to iDempiere which is developed by Logilite. This feature is an original part of Adaxa Suite and Adaxa has allowed us to convert it to the iDempiere feature. Logilite has additionally added call out support in Adaxa’s quick entry form.


iDempiere Quick Form :

iDempiere Quick Form is a feature for user who likes to work only with keyboard and allow fast data entry. iDempiere Quick Form provides full navigation support with a keyboard. Also, quick form supports keyboard shortcut to perform operations.

Below is a snap of iDempiere Quick Form.

iDempiere Quick Form panel
Figure 1: Sample Quick Form panel
  • The Quick Form provides a handy feature like a user can navigate by using arrow keys, navigate to the cell user want to modify and make the changes. A nice thing is a record will be automatically saved once the user navigates to next record, or a user can save record by pressing “Alt + S” keys together or by clicking save button.
  • If user navigating down from the last record, new record will auto created.
  • Pressing  “home” key will navigate to the first record of the current page.
  • Quick Form has pagination feature, DOWN arrow key on last record allow to navigate to next page and UP arrow key on first record allow to navigate to previous page. Alternatively quick form has pagination panel to jump to page or navigate using mouse.
  • A user can also undo change by pressing “Alt + Z” keys together or by using “Undo” button for the current record if modified.
  • “Alt + D” keys use for deleting current record and multiple records can be deleted by selecting checkbox of record’s and pressing “delete” button.
  • A user can re-query records by pressing “Alt + E” keys together or by using “Re-Query” button.
  • To close Quick Form after saving last change, user can directly close Quick Form using “OK” button. or use “Alt + K” keys.
  • For close Quick Form without saving last change user can directly close Quick Form using “Close” button. or using  “Alt + X” keys.
  • Instead of clicking on toolbar button, user can using “Shift + F2” key to open current tab as quick editing form.
  • From Header tab, If user want to open child tab quick form OR moving to header quick form current focused record to it’s child tab quick form then use “Ctrl + F2” key.
 iDempiere Quick Form Panel Buttons
Figure 2: Quick Form Panel Buttons
  • A user also can customize fields order and width of columns by pressing “Alt + L” keys or by using “Customize” button.
  • All user can have their own set of configuration. Idempiere [Logilite] also allows a user to save width of a column, once you adjust the width in grid, before saving, select checkbox “Save Column Width”.  Selecting Save Column Width checkbox, persist current column width in grid layout.


Step to configure Quick Form for the tab:

Quick form works per tab. Once quick form field are configured, on windows tab, quick form button will be enabled. For configuring quick form field, Follow below steps

  •  Log in as ‘System User’.
  • Go to “Window, tab and field” and navigate to a window which you want to add support for quick form
  • On Window->tab->Field, you found the checkbox “Quick Form”. Marking this checkbox make the field visible in Quick Form.
iDempiere Quick Form panel
Figure 3: Configuring Quick Entry field.
  •   Tick “Quick Form” checkbox for the fields you want to see in “Quick Form” panel and save the changes. (as shown in Figure 3)
  • If you want to test the immediate effect, do cache reset.
  • Quick Form toolbar button is enabled when tab has at least one field configured as Quick Form
  • Now login to ‘Client User’ and open configured tab. In a toolbar, you will find the “Quick Form” button as editor icon, click on the button to open “Quick Form” panel
Sample Quick Form panel
Figure 4: Sample Quick Form toolbar button

Best Regards
Sachin Bhimani & Parth Ambani @ Logilite Technologies

Share Button

Window Shortcuts in ADempiere/iDempiere

“If you are working with very small set of window, form or process in adempiere and you love to work with shortcuts,
you may love this feature of Adempiere/iDempiere. I can say this as enabling command into Adempiere/iDempiere”.

This blog is in our series of improving work efficiency in Ad/iD.

The purpose of this post is to guide you to use “Search definition” menu in ADempiere which allows to configure search for easy and fast searching of records. This is a standard ADempiere functionality that lets you define exactly what action the system takes when someone enters characters in the ‘Lookup’ box on the main menu screen.

It allows two type of ‘Search Type’

1. Table

Setup for what happens when user type ‘/o’ and enter  or ‘/o <some characters>’ and enter in Lookup box on the main menu screen

window-sortcut-adempiere-idempiere-query
Here you can find orders(sales/purchase) by entering “/O  <DocumentNo>” in Lookup Box.
Some examples shown below.
  •  ‘/O DO12345’ Open order with ‘Document No’ equals to ‘DO12345’.
  • ‘/O  SO123%’ Open  all orders whose document number starts with ‘SO123’.’
  • ‘/O’ Open  order window.

2. Query

Setup for what happens if user types ‘/BP’ or /’BP <some string>’ in Lookup box.

window-sortcut-adempiere-idempiere-table


In this type of search you can set query to search window. Above configurations allow you to search ‘Business Partner’ records by given
Business Partner Name or Contact Name.Some Examples shown below.

  • ‘/BP’ open the Business Partner window.
  • ‘/BP’ pet%’ open the BP window and bring back any records where the BP name or any contact name of BP contains ‘pet’.
Some other variants you can use:
‘/O BP’ open both Business Partner and Order window.

By using this facility you can configure search as per your requirements like configure search definition which finds all ‘Order’ records belongs to some Business Partner.

I hope this helps!

Regards,

Nikunj Panelia

Share Button