iDempiere Quick Form

Since iDempiere is forked from Adempiere, iDempiere has added many features to increase user productivity. This blog introduce iDempiere features which can improve user experience on browsing data and increase work efficiency.


About iDempiere:

iDempiere is an Open Source Enterprise Resource Planning (ERP) software package. Which helps companies satisfying their ERP needs and offer flexibility to customize. iDempiere has out of the box features which required to run your business. In this blog will introduce new features named Quick Form to iDempiere which is developed by Logilite. This feature is an original part of Adaxa Suite and Adaxa has allowed us to convert it to the iDempiere feature. Logilite has additionally added call out support in Adaxa’s quick entry form.


iDempiere Quick Form :

iDempiere Quick Form is a feature for user who likes to work only with keyboard and allow fast data entry. iDempiere Quick Form provides full navigation support with a keyboard. Also, quick form supports keyboard shortcut to perform operations.

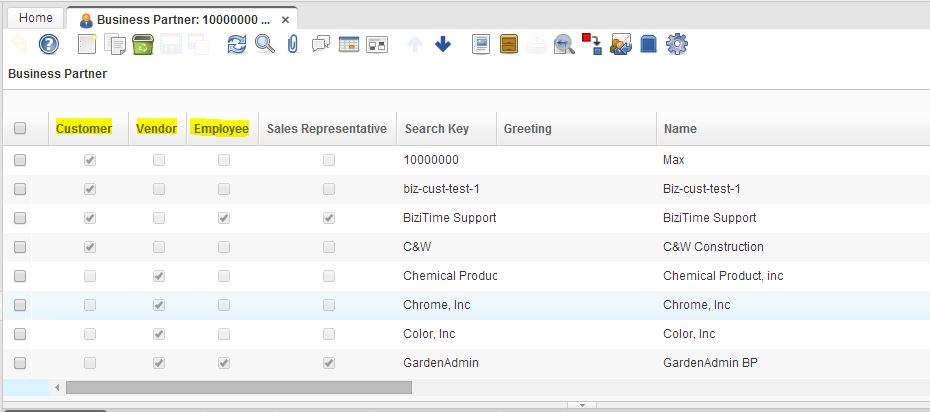
Below is a snap of iDempiere Quick Form.

iDempiere Quick Form panel
Figure 1: Sample Quick Form panel
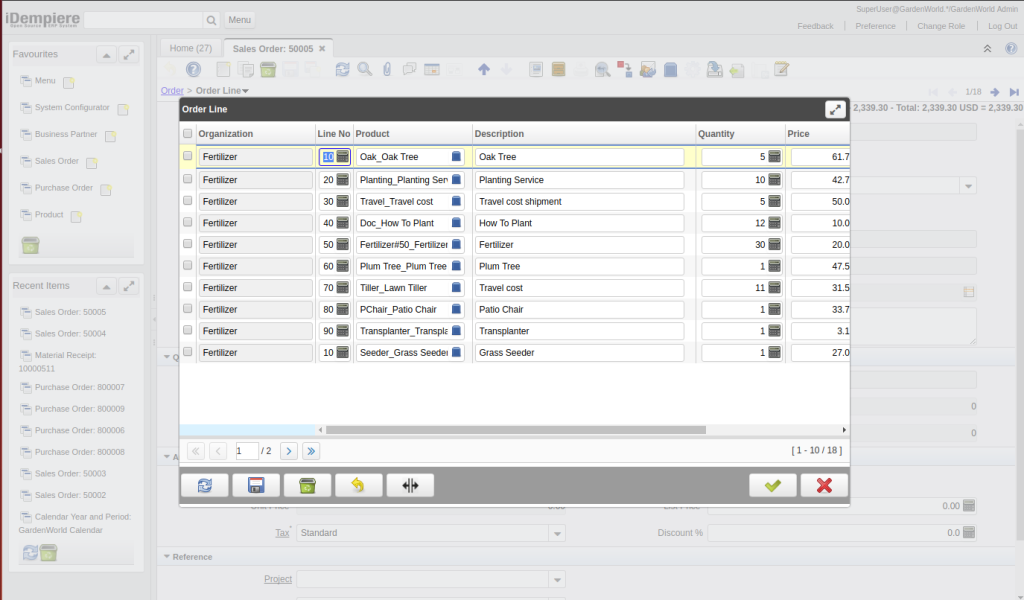
  • The Quick Form provides a handy feature like a user can navigate by using arrow keys, navigate to the cell user want to modify and make the changes. A nice thing is a record will be automatically saved once the user navigates to next record, or a user can save record by pressing “Alt + S” keys together or by clicking save button.
  • If user navigating down from the last record, new record will auto created.
  • Pressing  “home” key will navigate to the first record of the current page.
  • Quick Form has pagination feature, DOWN arrow key on last record allow to navigate to next page and UP arrow key on first record allow to navigate to previous page. Alternatively quick form has pagination panel to jump to page or navigate using mouse.
  • A user can also undo change by pressing “Alt + Z” keys together or by using “Undo” button for the current record if modified.
  • “Alt + D” keys use for deleting current record and multiple records can be deleted by selecting checkbox of record’s and pressing “delete” button.
  • A user can re-query records by pressing “Alt + E” keys together or by using “Re-Query” button.
  • To close Quick Form after saving last change, user can directly close Quick Form using “OK” button. or use “Alt + K” keys.
  • For close Quick Form without saving last change user can directly close Quick Form using “Close” button. or using  “Alt + X” keys.
  • Instead of clicking on toolbar button, user can using “Shift + F2” key to open current tab as quick editing form.
  • From Header tab, If user want to open child tab quick form OR moving to header quick form current focused record to it’s child tab quick form then use “Ctrl + F2” key.
 iDempiere Quick Form Panel Buttons
Figure 2: Quick Form Panel Buttons
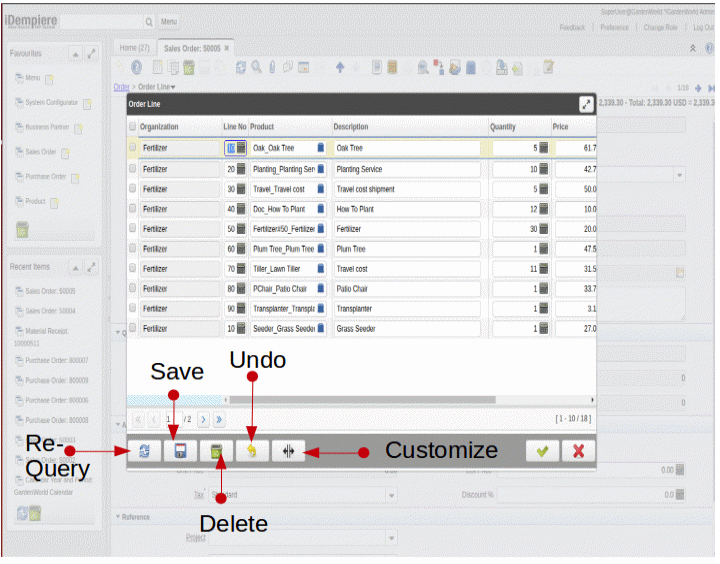
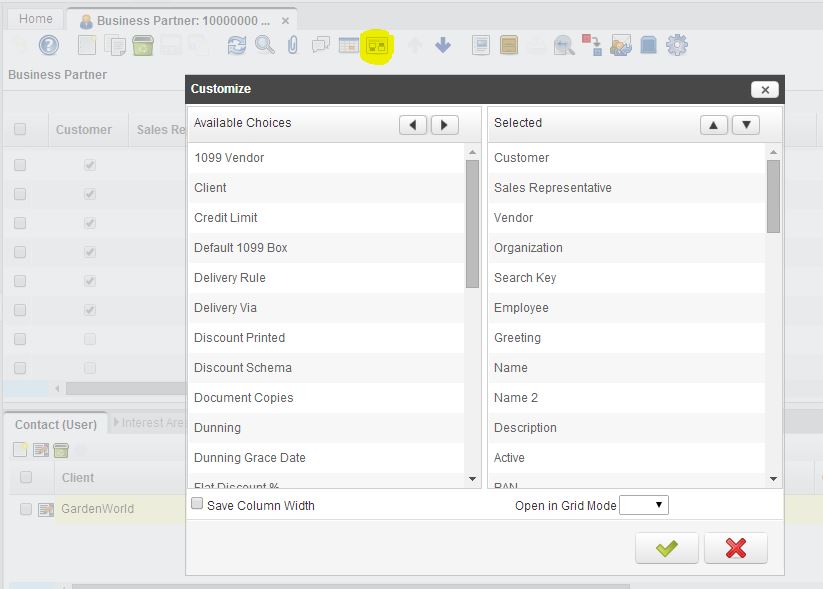
  • A user also can customize fields order and width of columns by pressing “Alt + L” keys or by using “Customize” button.
  • All user can have their own set of configuration. Idempiere [Logilite] also allows a user to save width of a column, once you adjust the width in grid, before saving, select checkbox “Save Column Width”.  Selecting Save Column Width checkbox, persist current column width in grid layout.


Step to configure Quick Form for the tab:

Quick form works per tab. Once quick form field are configured, on windows tab, quick form button will be enabled. For configuring quick form field, Follow below steps

  •  Log in as ‘System User’.
  • Go to “Window, tab and field” and navigate to a window which you want to add support for quick form
  • On Window->tab->Field, you found the checkbox “Quick Form”. Marking this checkbox make the field visible in Quick Form.
iDempiere Quick Form panel
Figure 3: Configuring Quick Entry field.
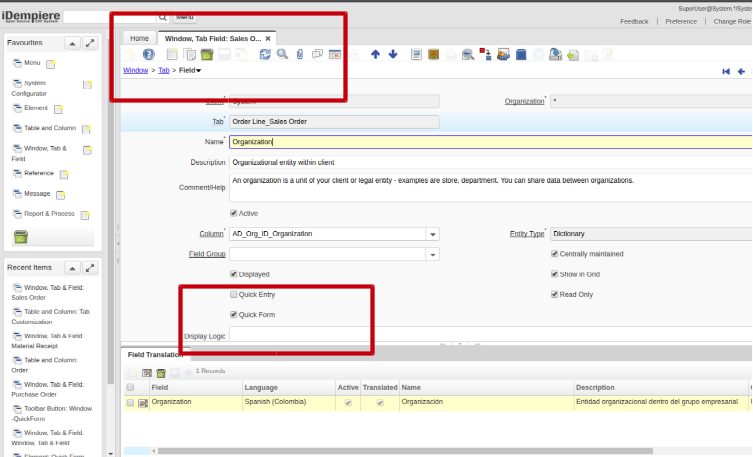
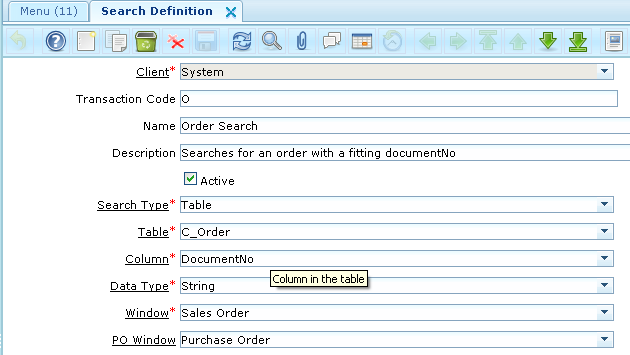
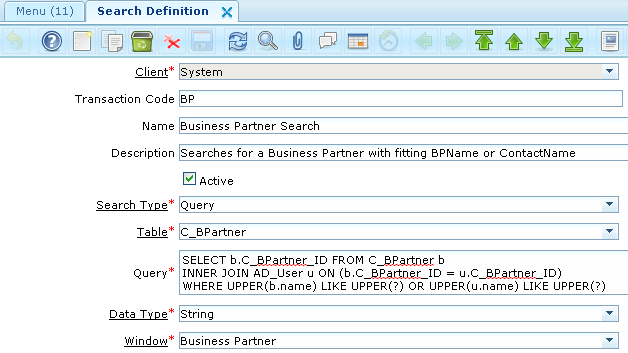
  •   Tick “Quick Form” checkbox for the fields you want to see in “Quick Form” panel and save the changes. (as shown in Figure 3)
  • If you want to test the immediate effect, do cache reset.
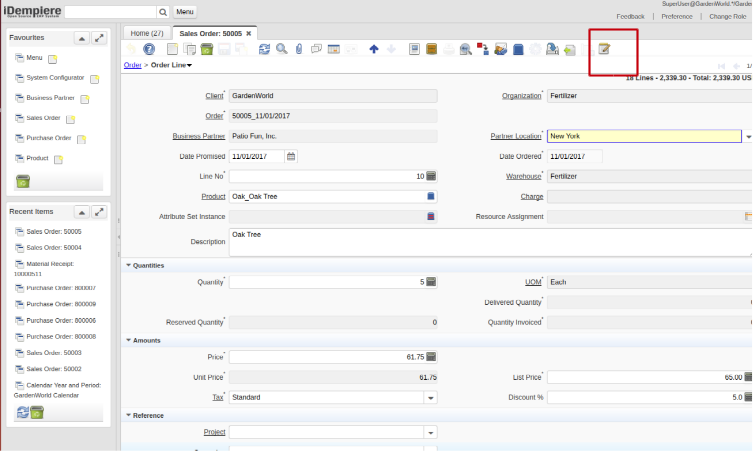
  • Quick Form toolbar button is enabled when tab has at least one field configured as Quick Form
  • Now login to ‘Client User’ and open configured tab. In a toolbar, you will find the “Quick Form” button as editor icon, click on the button to open “Quick Form” panel
Sample Quick Form panel
Figure 4: Sample Quick Form toolbar button

Best Regards
Sachin Bhimani & Parth Ambani @ Logilite Technologies

Share Button

User friendly and customizable DataGrid in iDempiere

Since iDempiere is forked from adempiere, it has added many feature to increase user productivity. Starting blog to introduce iDempiere features which can improve user experience on browsing data and increase work efficiency.

About iDempiere:

iDempiere is a Open Source Enterprise Resource Planning (ERP) software package. Which helps companies satisfying their ERP needs with low cost and offer flexibility to customize. iDempiere comes out of the box with every feature installed and configured to run your business. In this blog will introduce to some of cool features in data grid.

Data Grid:

Data grid is a nice feature to view list of data in tabular format in one site. In iDempiere every window comes up with data grid. Below is snap of data grid.

basic grid view

This grid provide some of handy features like on double click of any record it will toggle to form view and user can make modification to the record. Even one can modify data inline in grid itself, click on cell you want to modify and make the changes. Nice thing is record will be automatically saved once you move to next record, you can always save record by clicking save button.

User level customization to Data Grid:

Data grid by default will show all the fields (configured with isDisplayed = Y), some of user dose not like to see everything but they would like to see only attributes which are important to them.

iDempiere has added a nice feature using that user can save their own customization to Grid, i.e. They can choose which columns only need to show up and also in which sequence. To achieve this what you need to do is, click on tool bar button “Customize”  (highlighted in below image) and that will pop-up below dialog.

user choice dialog view

This dialog supports drag and drop functionality so keep only attributes which you want to see in “Selected” section (right side of dialog), Also adjust sequence of selected attributes by moving them up or down. After making all this changes save the configuration.

For example with reference to above screen, I am removing “Organization” column and would like to see Customer, Vendor and Employee column together. We can setting like below screen.

my changes BP

On save of configuration it will immediately re-renders data grid to reflect the changes

result of my changes to BP

When another user logs inn they can have their own set of configuration. iDempiere also allows user to save width of column, once you adjust the width to your comfort level, before saving, make a selection on check box “Save Column Width” it will save changes for you.

Set Default Mode:

If user likes to open a windows directly in Grid mode, user can set the same. on same customize dialog from where we do customization, there is a option at bottom “Open in Grid Mode”, if user set this to ”Yes”, for that window records will always open in Grid mode by default.

As a System administrator if you would like to hide some of columns in grid and do not want them to display in grid, you can achieve the same in iDempiere. For this there is a flag at each field level in iDempiere with name “IsDisplayedGrid”. If you set this to FALSE then that field will not appear on grid.

Open Source:

iDempiere is open source ERP, BUT open source dose not means CHEAP, if we dont know what to change in source code and and what will be the over all impact in all ERP modules one need to pay more in terms of money as well as time. So need to be very careful while making source code changes.

Best Regards,
Kirit @ Logilite Technologies.

Share Button

Window Shortcuts in ADempiere/iDempiere

“If you are working with very small set of window, form or process in adempiere and you love to work with shortcuts,
you may love this feature of Adempiere/iDempiere. I can say this as enabling command into Adempiere/iDempiere”.

This blog is in our series of improving work efficiency in Ad/iD.

The purpose of this post is to guide you to use “Search definition” menu in ADempiere which allows to configure search for easy and fast searching of records. This is a standard ADempiere functionality that lets you define exactly what action the system takes when someone enters characters in the ‘Lookup’ box on the main menu screen.

It allows two type of ‘Search Type’

1. Table

Setup for what happens when user type ‘/o’ and enter  or ‘/o <some characters>’ and enter in Lookup box on the main menu screen

window-sortcut-adempiere-idempiere-query
Here you can find orders(sales/purchase) by entering “/O  <DocumentNo>” in Lookup Box.
Some examples shown below.
  •  ‘/O DO12345’ Open order with ‘Document No’ equals to ‘DO12345’.
  • ‘/O  SO123%’ Open  all orders whose document number starts with ‘SO123’.’
  • ‘/O’ Open  order window.

2. Query

Setup for what happens if user types ‘/BP’ or /’BP <some string>’ in Lookup box.

window-sortcut-adempiere-idempiere-table


In this type of search you can set query to search window. Above configurations allow you to search ‘Business Partner’ records by given
Business Partner Name or Contact Name.Some Examples shown below.

  • ‘/BP’ open the Business Partner window.
  • ‘/BP’ pet%’ open the BP window and bring back any records where the BP name or any contact name of BP contains ‘pet’.
Some other variants you can use:
‘/O BP’ open both Business Partner and Order window.

By using this facility you can configure search as per your requirements like configure search definition which finds all ‘Order’ records belongs to some Business Partner.

I hope this helps!

Regards,

Nikunj Panelia

Share Button