How to became a data scientist from beginner to expert ? PART – 1

graph

Let’s begin with the step’s used by the data scientist to perform his task or implement a module.

Below are the 7 major and minimal step’s to work while developing a machine learning model.


step 1. Data Gathering.
data-cleaning


step 2. Data Analysis.
data-analysis


step 3. Data Cleaning.
data-cleaning


step 4. Data Visualization.
visualization


step 5. Modelling with different statistical approach , predictable approach to solve the problem.
model


step 6. Select the model with highest accuracy.
accuracy


step 7. Deploy your first machine learning application.
deployment


Tool and Skills you must know, that will help you to design your first machine learning application for beginner.

I will explain every step’s in different single post’s with great details ,where you will learn what programming you should know , the module required to implement the machine learning application and the book’s to refer for beginner as best of my knowledge.
Stay tuned for further updates !!!!

Thanks.

Share Button

User friendly and customizable DataGrid in iDempiere

Since iDempiere is forked from adempiere, it has added many feature to increase user productivity. Starting blog to introduce iDempiere features which can improve user experience on browsing data and increase work efficiency.

About iDempiere:

iDempiere is a Open Source Enterprise Resource Planning (ERP) software package. Which helps companies satisfying their ERP needs with low cost and offer flexibility to customize. iDempiere comes out of the box with every feature installed and configured to run your business. In this blog will introduce to some of cool features in data grid.

Data Grid:

Data grid is a nice feature to view list of data in tabular format in one site. In iDempiere every window comes up with data grid. Below is snap of data grid.

basic grid view

This grid provide some of handy features like on double click of any record it will toggle to form view and user can make modification to the record. Even one can modify data inline in grid itself, click on cell you want to modify and make the changes. Nice thing is record will be automatically saved once you move to next record, you can always save record by clicking save button.

User level customization to Data Grid:

Data grid by default will show all the fields (configured with isDisplayed = Y), some of user dose not like to see everything but they would like to see only attributes which are important to them.

iDempiere has added a nice feature using that user can save their own customization to Grid, i.e. They can choose which columns only need to show up and also in which sequence. To achieve this what you need to do is, click on tool bar button “Customize”  (highlighted in below image) and that will pop-up below dialog.

user choice dialog view

This dialog supports drag and drop functionality so keep only attributes which you want to see in “Selected” section (right side of dialog), Also adjust sequence of selected attributes by moving them up or down. After making all this changes save the configuration.

For example with reference to above screen, I am removing “Organization” column and would like to see Customer, Vendor and Employee column together. We can setting like below screen.

my changes BP

On save of configuration it will immediately re-renders data grid to reflect the changes

result of my changes to BP

When another user logs inn they can have their own set of configuration. iDempiere also allows user to save width of column, once you adjust the width to your comfort level, before saving, make a selection on check box “Save Column Width” it will save changes for you.

Set Default Mode:

If user likes to open a windows directly in Grid mode, user can set the same. on same customize dialog from where we do customization, there is a option at bottom “Open in Grid Mode”, if user set this to ”Yes”, for that window records will always open in Grid mode by default.

As a System administrator if you would like to hide some of columns in grid and do not want them to display in grid, you can achieve the same in iDempiere. For this there is a flag at each field level in iDempiere with name “IsDisplayedGrid”. If you set this to FALSE then that field will not appear on grid.

Open Source:

iDempiere is open source ERP, BUT open source dose not means CHEAP, if we dont know what to change in source code and and what will be the over all impact in all ERP modules one need to pay more in terms of money as well as time. So need to be very careful while making source code changes.

Best Regards,
Kirit @ Logilite Technologies.

Share Button

Conditional Breakpoints for Effective Debugging with Eclipse in JAVA

If you are working in JAVA and debugging your code in Eclipse and you have case when there are large number of iterations and you are interested to hit breakpoint on line only when certain condition become true then It will  be a better approach to use feature of conditional breakpoint in Eclipse.”

Debugging is the most important activity for developers and nowadays there are many IDEs available with lot of features for debugging. The purpose of this post is to aware you about a very useful feature of Eclipse that can be used when debugging your JAVA code with loops having larger iterator.

In normal breakpoint, you have to repeatedly break and manually check if your condition becomes true. It will be time consuming when you are working with large numbers of iterations. So in that case conditional breakpoints will be helpful. Better understandable by below example.

Suppose you have scenario like below.

Java code for conditional break point

And you need to hit break point on line inside loop only when value of list element is equals to certain value.

To set up conditional breakpoint Right Click on breakpoint.

Conditional berakpoint menu


Then select “Breakpoint Properties…” option  and Check ‘Conditional’ .

Conditional Breakpoint eclipse java

Enter your desired condition in text area. Above configuration  will hit breakpoint  only when value of list element is equals to ‘Java’.

Points  to remember:

  • Condition you  set must return Boolean value. Make sure will JAVA allow me to set this condition in IF statement . You can use complex conditions by using && and/or ||.
  • If there is possibility to having null value for object , then better to use null checking to avoid errors , eg. list.get(i) != null && list.get(i).toString.equals(“Java”).
  • You can use auto complete (Ctrl+Space) in the condition text box.

Using Hit count feature:

If you want to hit breakpoint  after line has been executed certain number of times, you can select ’ Hit count ’ option and enter number of iterations you want to skip.

Hit count eclipse conditional nreakpoint

Above Configuration  will  hit breakpoint on line after that line has been executed 10 times.

Also you can use combination of above two types of conditions. So Eclipse will stop breakpoint  only after line has been  executed number of ‘hit counts’ and condition is true.

Note that breakpoint condition is same as normal java code. So take care of scope of variables used in condition  and possibilities of Compile/Run time exceptions and yes, always check your condition is returning Boolean.

I hope this helps!

Regards,

Nikunj Panelia


Share Button

Easy and useful Lookup options in iDempiere


Hello dear friends, If you are using a wonderful truly open source ERP, iDempiere this blog will really help you work faster with lookup options. If you have never used this product then still not late atleast worth trying to know about its great features


About iDempiere:

iDempiere is a Open Source Enterprise Resource Planning (ERP) software package. Which helps companies satisfying their ERP needs with low cost and offer flexibility to customize.

iDempiere comes out of the box with every feature installed and configured to run your business

In my this first blog will introduce some of cool features in find window.

History records on Look up:

Usually what we do to search for record on window is click on “Lookup Record” button or  Lookup-Adempiere_Idempiere Lookup_Adempiere Idempiere Lookupuse shortcut “Alt + F”. This will allow you to search based on primary attributes e.g name, key etc.

Interesting thing to note is “History records” drop down.Lookup-adempiere-Idempiere

In case you just want to search records created within same day or in last week. You just need to select that option from History records and do search, no need to enter any other detail.

Lookup-adempiere-Idempiere Lookup-Adempiere


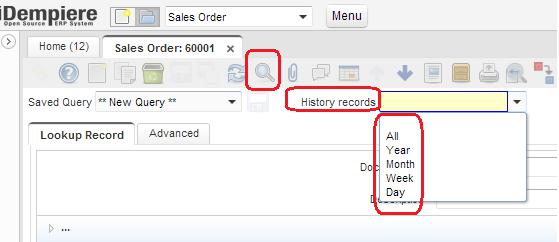
This option can be apply on top of your search query. Means results will be fetched from selected range only.

Saving search query:

If you are searching with common attributes multiple time, no need to worry. Just create once the query and save it for future usage. This option works only with “Advanced” tab on look up window

Lookup-Adempiere-Idempiere Lookup-Adempiere Idempiere Lookup-
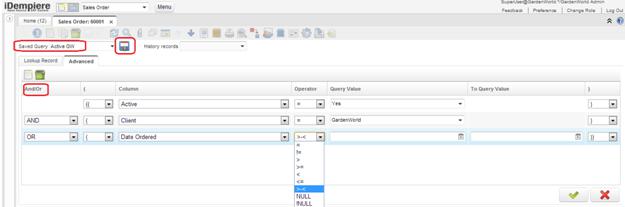
This is very handy and easy too, Create your query as iDempiere allow you to create any combination of AND/ OR operators as shown above to locate your records.

Name your search and click on save icon. Done! Now any time you select this search option and go ahead for searching your favorite records.

History criteria, if selected will work on top of results of any your advanced searches. e.g if you are looking for orders of business partner “Peter” and selected “Week” as history criteria then orders of last week only appear for Business Partner “Peter”.

Hope these lookup handy options will help you work faster for all your work!

Advance Query building

In Advance lookup tab, iDempiere provides way to build complex queries to search for records. There is a AND/OR operators available which can be used to build multiple selection criteria with braces.

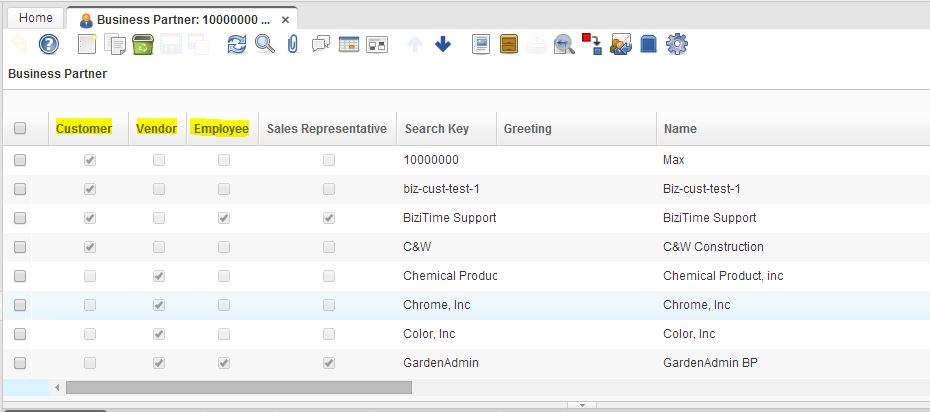
For example if we want to select All the business partner who are Customer and Vendor, Or if they are employee. We can have Advance query like

((Customer = Yes) AND (Vendor = Yes)) OR (Employee = Yes)

Best Regards,

Kirit @ Logilite Technologies.

Share Button

Window Shortcuts in ADempiere/iDempiere

“If you are working with very small set of window, form or process in adempiere and you love to work with shortcuts,
you may love this feature of Adempiere/iDempiere. I can say this as enabling command into Adempiere/iDempiere”.

This blog is in our series of improving work efficiency in Ad/iD.

The purpose of this post is to guide you to use “Search definition” menu in ADempiere which allows to configure search for easy and fast searching of records. This is a standard ADempiere functionality that lets you define exactly what action the system takes when someone enters characters in the ‘Lookup’ box on the main menu screen.

It allows two type of ‘Search Type’

1. Table

Setup for what happens when user type ‘/o’ and enter  or ‘/o <some characters>’ and enter in Lookup box on the main menu screen

window-sortcut-adempiere-idempiere-query
Here you can find orders(sales/purchase) by entering “/O  <DocumentNo>” in Lookup Box.
Some examples shown below.
  •  ‘/O DO12345’ Open order with ‘Document No’ equals to ‘DO12345’.
  • ‘/O  SO123%’ Open  all orders whose document number starts with ‘SO123’.’
  • ‘/O’ Open  order window.

2. Query

Setup for what happens if user types ‘/BP’ or /’BP <some string>’ in Lookup box.

window-sortcut-adempiere-idempiere-table


In this type of search you can set query to search window. Above configurations allow you to search ‘Business Partner’ records by given
Business Partner Name or Contact Name.Some Examples shown below.

  • ‘/BP’ open the Business Partner window.
  • ‘/BP’ pet%’ open the BP window and bring back any records where the BP name or any contact name of BP contains ‘pet’.
Some other variants you can use:
‘/O BP’ open both Business Partner and Order window.

By using this facility you can configure search as per your requirements like configure search definition which finds all ‘Order’ records belongs to some Business Partner.

I hope this helps!

Regards,

Nikunj Panelia

Share Button